
A Guide To Building A Shower Inside Your Bus Conversion

Alright, look - this got FAR more in depth than I had planned. Strap in, this is very long, but I’ve really done my best to cover every angle of the shower component of your build (and mine), and hopefully help answer some of the most common shower building questions when it comes to shuttle bus conversions.
I say this emphatically - the shower we built is in my top three favorite features of our build. Honestly it might even be my favorite thing. Having a comfortable, functional shower in your rig is a luxury that, in my opinion, cannot be overstated.
That said, there’s a lot to consider when adding one of these to your shuttle bus build. Let’s look at materials, order of operations, available fixtures and water heater options, and how to use tile effectively in something that moves.
A note - I’ve linked to several products that we used throughout our shower build in this guide. If you make a purchase through Amazon using these links, I get a small commission. It doesn’t cost you anything extra and it helps me make more free guides like this!
Order of Operations
A constant disclaimer you’ll find all over this website - this is just how we did things. There are TONS of ways to go about every conversion project, and we are by no means contractors. That said, here’s the order in which we worked when it came to our shower stall, alongside some useful stuff we learned along the way.
Framing & Sizing
You need a solid frame in the area you’re building your shower. We used 2x2s and I would absolutely not go smaller than that. 2x4s would also have worked and provide even more strength. You’ll want each of the four corners to be well supported, and you’ll want a number of supports running horizontally as well for added structure. It helps to have a plan in mind for what your shower will look like at the end to know where you want to add extra strength - are you adding a shelf? A grab handle? Make sure there is support where you need it.
You’ll also want to make sure your shower is big enough. I highly recommend taping out a box on the floor where you plan to put your shower in the size you want it to be, and then standing in it. A standard small shower pan for a house is 36”x36” - if you’re going smaller than that, proceed with caution, even though lots of smaller shower pan sizes exist for RVs. Showers that are uncomfortable to use often just become storage closets. Our shower is not a traditional square - it’s about 33” wide, 33” on the longer side (towards the cab) and 24” on the shortest. This is very small for a shower - but we are very small people, and it’s comfortable for us. Keep your own tolerances in mind (and then go a couple inches bigger than that if you have the room).

I recommend creating as many straight walls as you can to build on in this space. It makes the build process easier and gives you more options for eventual shower wall coverings. We intentionally did not do this, and while our solution worked for us, it may not work for everyone. We have a curved wall at the back of our shower due to the curve our exterior bus walls. We didn’t want to sacrifice more space to create a straight wall in that area, so - we beefed up the furring strips around that window and attached half inch plywood directly to them to serve as the base for that particular wall. I already had our final shower design in mind when we did this, and I would not recommend this route if you’re going with something heavier like actual tile. If you’re doing that, frame out a straight, square wall to build on as close to your exterior wall as possible to save as much space as you can.
Water Lines
Your water lines should be run before you start building beyond the initial framing. Our plumbing guide (coming soon!) will have more information on the construction of a fresh water system for your bus. You’ll presumably want both a hot and a cold line coming into your shower, and set up so that you have connections for your shower mixer in the location that the mixer will eventually be installed.
Access: *** Make sure you do not build your connections into a place where you cannot ever access them again!*** Water connections, even well-installed ones, can leak and should be regularly checked. You absolutely do not want to put your connections behind a solid wood wall in your shower and tile over them. You absolutely MUST give yourself access to anywhere you have water connections!
Here’s how we did that. Our shower butts up against our fridge compartment, which is under our kitchen counter. I realized after building the kitchen that we didn’t have a plan for access for where our water lines would connect to our shower mixer. So I pulled our fridge out, and cut a roughly 1’x2’ hole through the side of our fridge storage and backside of our shower wall. Now all we have to do to access those connections is take out our fridge, but otherwise the access panel is totally hidden.
Drain
Of course you’ll need a drain in your shower, and that drain should connect to your grey tank. I highly recommend keeping your grey tank and shower as close together as possible - the less drain pipe you have to run, the less places for blockages to occur and grading issues to happen (grey water backing up into your shower is not fun). I’d also recommend knowing where you want your drain as early as possible - you’ll want to climb underneath your bus and make sure that the location you’ve chosen doesn’t overlap with anything like pieces of your bus frame.
Something else to keep in mind is how water is going to move when you are parked. Our first rig had a pretty aggressive forward tilt, and as a result water always pooled in the front corners of the shower if we didn’t make a point to try and level ourselves. I wanted to do a linear drain like this along the cab-facing wall of our shower to combat this issue in the bus, but structural components underneath kept us from going this route, and we instead leveled our shower during the tile installation (discussed below). But it’s something to keep in mind - try to place your drain in a location that will allow water to drain instead of pooling up.
Over the course of this build I became a big fan of Kerdi-Schluter products (discussed further below), and I used one of their drains in conjunction with some of their other products. Their system works with 1 1/2” PVC which made getting materials to connect our shower into our grey system about as simple as it gets.
A note on P Traps: This isn’t meant to be a guide to grey water systems (more on that coming soon), but you’ll want to include an odor-prevention element in your shower drain system. P traps are the standard system used in residential applications and some RVs as well, but we went with HepvO valves, and they’re great. Incredibly easy to install, water-free (P traps can dry up in arid climates, rendering them non-functional) and we’ve had absolutely zero issues with odors so far.
Underlayment
When your lines are in place and your framing is up, you’ll want to install an underlayment - that is, whatever is going between your framing and your top layer of your shower (i.e. tile). The most common underlayment in DIY camper showers is plywood - it’s cheap, accessible, and can be made waterproof fairly easily. This is how our shower is built - we have half inch plywood on each wall, and the walls and floor are all coated with several layers of RedGard. This is a waterproofing membrane that goes on like paint and will make your plywood surface completely waterproof after a few coats. I had no idea this existed before we did our build, and I ended up using it all over the place because I found it to be so effective.
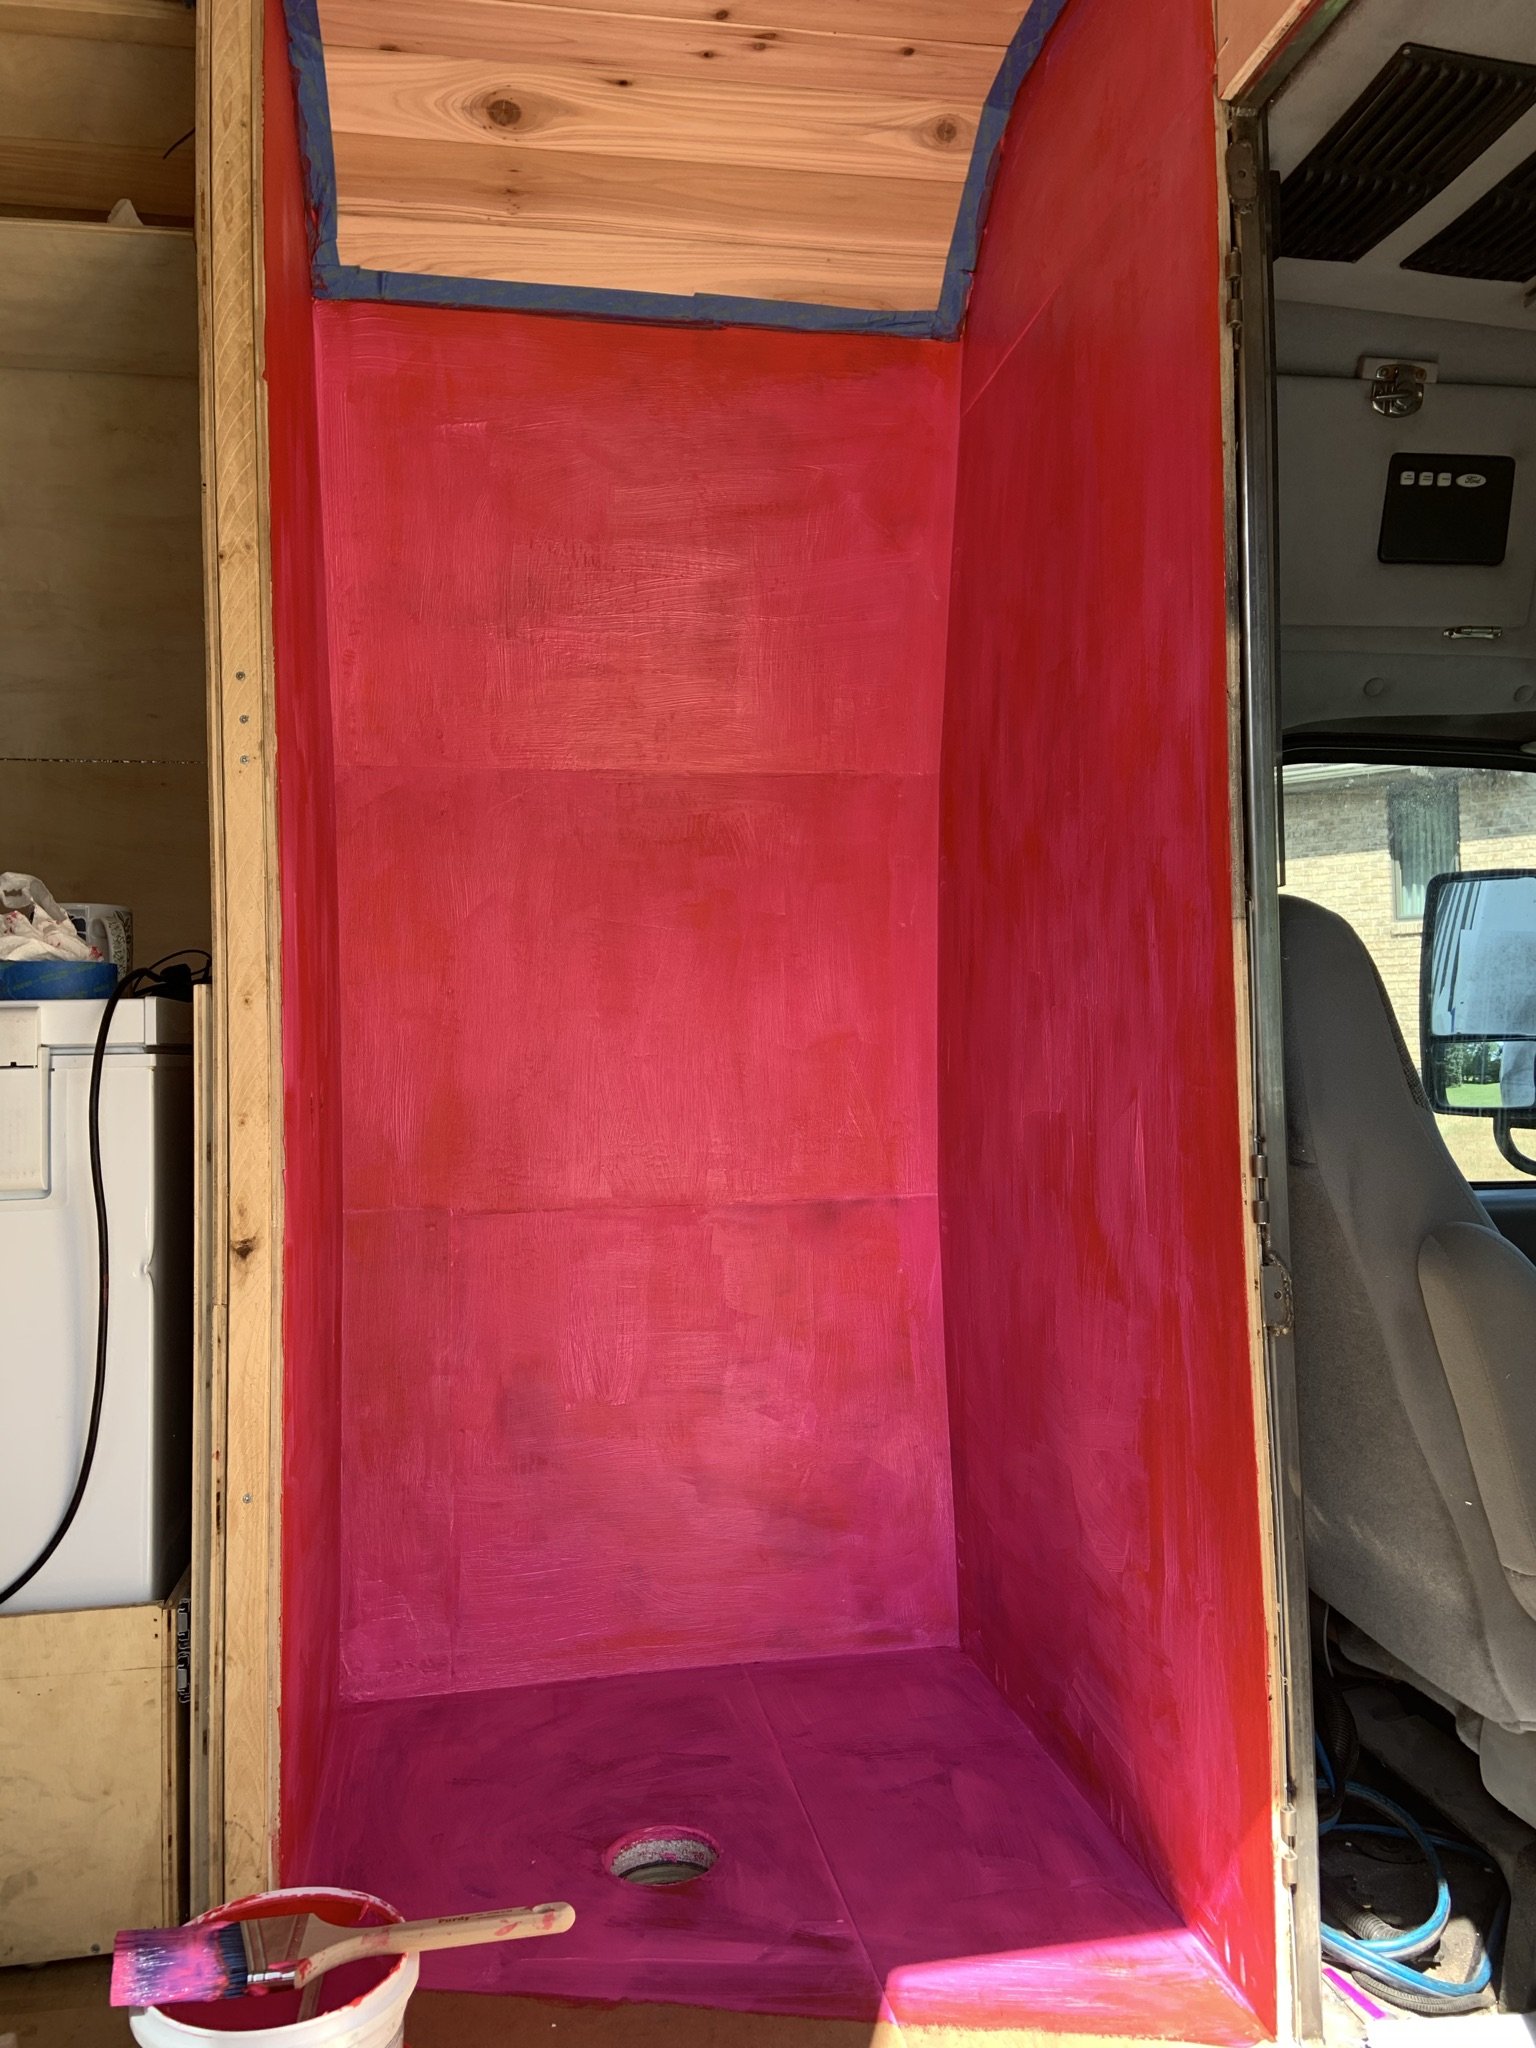
Our shower stall coated in RedGard.
You also have the option to use a backer board here, especially worth considering if you’re going the full tile route. Some of the recommendations I’ve seen include EZ Board, DensShield, and wedi board, though please note I’ve not personally used any of these systems, and while they’re described to be durable and flexible, I can’t personally vouch for them.
I’ve also seen some builds use traditional cement backer board. This is what is typically installed under tile in residential applications. I know that its been done in a few different buses, but many have concerns about how well it will hold up over time. Cement backer board is - as the name implies - made with cement, and cement notoriously does not hold up well to the moving, twisting, and shifting that happens in a bus as it travels. That said, many people have installed this kind of underlayment without issue. Just something to keep in mind as you make your decision here.
Shower Pan
Shower pans can be as simple or as complex as you’d like. By far the easiest route is to buy a prefabricated plastic shower tray and size your shower stall to fit. I’ve heard reports that these pans don’t hold up well over time, but we had one in our first rig and did not have any problems with it.
If you don’t want to buy a pan, there’s a few ways to make one instead. Because our shower has an angled floorplan, we had to go this route. We used a Schluter-Kerdi shower tray and matching curb to create our floor shape (installed over a plywood / RedGard coated floor). This is a closed-cell foam pan that comes in a variety of sizes and can be cut with a utility knife to your specified dimensions. I used both the pan, curb, and drain system from Kerdi, because their tutorials are top-notch and very easy to follow. They’re not the cheapest method, but for someone with no experience in this area, this made sense to make room in our budget for.
Now. If I were doing the shower over again, I would probably not go this route. Why? Because I absolutely hated installing the tile that went over it (it took me 3 attempts to get it right). And I was under the impression that tile would be a quick and easy way to get a fully waterproof and solid floor. I was very incorrect on that front. I would either A) order a custom shower pan in an already waterproof material like plastic or metal, or B) create a waterproof wood base the same way we created the framing for our shower door (discussed further below in the Other Shower Wall Coverings section). That said, if you like the look of floor tile and are prepared to take on the project, this is a super DIY friendly way to do it!
Shower Curbs - this is the barrier that stops water from running out into your main living area (you can see ours in the picture labeled with dimensions above). Unless you’re doing a curbless shower and setting your shower pan into your subfloor for that “seamless” look (I’ve seen it done - it’s very cool, but a bit more involved), you’ll want to make sure you have one of these in place. We bought a Kerdi curb to match our pan, knowing that we would need a custom angled piece in that location - and because the Kerdi can be cut with a utility knife, it made putting it together almost too simple.
Tile
So let’s address the million dollar question - can you use tile in a bus build shower? By now I’m sure you’ve realized that the answer is of course yes, but there’s a lot to take into consideration before jumping in.
Here’s another disclaimer - I am not a tile expert. At all. I made plenty of mistakes during this process, and I hope you can learn from them and save yourself some time and headache. But please feel free to research this topic elsewhere, and perhaps consult a person who does this for a living for more technical help and information. That all being said - when you make mistakes, you learn, and I’ve most definitely learned a few things about this topic. Let’s get into it.
Basic Tile Information:
Tile goes on top of your underlayment and is most commonly secured with thinset mortar. Once the mortar dries, grout is used to fill the spaces between the tiles to create a waterproof surface. There are a LOT of types of mortar and grout, and using the correct one for the correct application is critical.
The concern with tile in a bus build is that mortar and grout are not designed to withstand the kind of motion that occurs while the bus is moving. It is a legitimate concern, and I have seen builds have tiles fall right off their walls after heading down a bumpy road. However, I’ve seen a ton of builds do tile successfully (ours included). Here are some popular adjustments to make tile more suitable to bus builds.
Flexible Grouts and Mortars
This is one of the easiest things you can do to help create longevity in your shower stall. Flexible thinsets are a great option - popular choices include FlexBond, Tec Super Flex, and Megalite. Flexible grouts also exist, including Dunlop and Ardex. Using products like these, your tile installation is much more likely to hold up over time due to - as the name suggests - a more flexible adhesion system. This is especially true if you’re going to tile your walls, where a loose tile is most likely to cause major problems. (Another note - I did not install any of these products in our rig, and these mentions are based off of the recommendations of other bus builders and RVers. Be sure to double check that they will work for you by thoroughly reading product descriptions and information before making a purchase.)
Silicone Grouts and Adhesives
This is something I came very close to doing for our build because the system has so many great reviews (before I discovered the product I eventually installed on our walls). If you’re determined to do a full tile shower, I’d definitely recommend you take a look at the FlexTile system. Using a silicone adhesive and silicone grout, which will hold up far better than traditional mortar and grout under such demanding circumstances, this removes all of the possibility of failing mortar, because no mortar is involved at all. This has been used in RVs over and over, and there’s a ton of examples of showers and kitchen backsplashes in RVs on their website, as well as some demo videos that explain the process in full.
Traditional Grouts and Mortars
Something to note is that a lot of high end RVs have tile in them somewhere, sometimes in huge sections of the floor. A lot of these luxury coaches use standard residential tile materials, and most people report general longevity with these systems. That’s what we did, too. We have a hardware store brand thinset on the floor, and a standard sanded grout in between the tiles. Because it’s a floor-only application, a loose tile doesn’t have the ability to fall and break itself or other tiles, so we were willing to take the risk and use the cheapest, most readily available products. So far, after over a thousand miles of driving and a dozen challenging dirt roads (and one bottoming out incident that definitely rattled our frame), we haven’t had a single issue with our tile cracking or coming loose.
Picking the RIGHT Mortar
Here’s something I did wrong that made my life way harder in this area than it had to be. Certain underlayments are not compatible with certain mortars. I (accidentally) bought mastic to originally set our tiles, and after still finding wet mortar after three days, discovered that a Kerdi pan is not compatible with the kind of mortar I bought. I needed an uncoupling membrane thinset for that specific underlayment. (To make a long story extremely short, mastic needs air to dry, and Kerdi is a waterproofing membrane that prevents air movement under the tiles. An uncoupling membrane mortar is designed to work on waterproof surfaces like Kerdi and RedGard and dries due to chemical reaction rather than air exposure.) As a result of my mistake, I had to not only rip out all the tiles and scrape all the mastic out of the shower pan, but the tiles were not salvageable and I had to throw them all away and start completely over.
The correct mortar for your application is going to depend heavily on the underlayment you’ve decided to use, as well as the location of the tiles (wall vs. floor). Because there are so many possible combinations, I can’t get into each and every one here. But when you go to the hardware store to buy things for this project, be sure to carefully read the specifications on the mortar you’re looking to purchase and make sure it is going to work for your project.
Choosing Tile
Like with so many things in these conversions, almost nothing is off limits when it comes to tile choice. I have seen ceramic, porcelain, glass, and mosaic tiles in every size in bus conversions. What’s most important is that you pick the right tile for the right application.
Tile material
Ceramic and porcelain are the most common tile materials used in residential applications and are regularly seen in bus builds. These types of tiles are fairly similar, the main differences being porcelain offers a higher water resistance and ceramic is often more affordable and more porous. Glass tiles are also a popular choice. I’ve never personally seen a build with cement, granite, or limestone tiles, but that’s not to say it couldn’t be done. But in a bus, your top concerns should be water resistance and durability - you want a strong, waterproof structure that is built to last. We have porcelain white hexagon tiles on the floor of our shower.
A note on peel & stick tiles: I wanted so badly to find a version of these that worked for inside a shower, but nothing I came across is rated for the kind of water exposure that shower walls see. Great for a kitchen backsplash, but probably best to avoid for a shower application.
Tile Size
There’s not too many rules in regards - if you’re tiling the shower floor, tiles are supposed to be 4” or smaller - it allows for better grading towards the drain and a floor with more grip when wet. Otherwise, pretty much anything else is fair game and comes down to your personal preference.
DumaWall - The Easiest Tile You’ll Ever Install
This is the tile we have. I ought to write these guys and ask for a sponsorship because of how often I sing their praises to other bus builders. My perspective may be slightly skewed by how much I did not enjoy installing our floor tile, but I really do think this is one of the best options out there to get a high-end looking finish in a bus shower.
DumaWall tiles are made of vinyl. This means you can cut them with literally any woodworking tools you have, like a jigsaw, chop saw, or even utility knife (if you’ve ever worked with a wet saw, you know how nice of a feature this is). You only need two things to install these in your shower - their preferred brand of construction adhesive, and their preferred brand of wet-environment sealant. They’re very large tiles (25.59” x 14.76”) which means fewer cuts and tiles to work with throughout the job. They’re designed using a tongue-and-groove system, which creates a seamless and completely waterproof finish. They’re also quite a bit lighter than traditional tile, even more so when you consider being able to eliminate mortar from the project altogether. No grout is needed either. Three boxes of tile did my entire shower with a couple left over, which cost about $225 - pretty modest in terms of our budget.
It took me ten, maybe twelve days to get the tiny patch of tile on the floor right. I did the entire DumaWall installation in our bus in 2 and a half days, and it was probably one of the easiest, most stress-free jobs of the entire build. 10/10 would recommend these tiles for your bus too.
Installing Tile
I’m going to direct you over to this article from Lone Oak Design Co. for the process on installing floor tile, because this is extremely similar to how I installed mine. For wall tile, the process is similar - this article from The Camping Advisor touches on some of the key points.
A couple things that I found helpful:
If you have access to a wet saw, it will make your life far easier than if you have to use a handheld tile cutter.
On the walls, start from the bottom and work up. On the floor, make all your cuts and lay out your tile “dry” on the floor before adding any sort of mortar or adhesive.
If you have strange angles in your shower like we do, a cardboard template can go a long way in helping you get the correct final shape for your tile without having to guess and waste tile in the process.
Make sure you use enough mortar. That mistake caused me to have to rip my tiles out a second time.
Weight concerns: This is something that always comes up whenever tile is discussed. It’s hard to find a figure on the exact weight that a shower tile installation will add, but further down in their article, The Camping Advisor estimates that it adds 75-130lbs. In the grand scheme of your build, that’s fairly insignificant (consider your bus was likely designed to haul 15-30 200lbs people).
Other Shower Wall Coverings
Don’t want tile? I definitely don’t blame you. Here are some other options we considered that we’ve seen in other rigs.
FRP Board
One of the most common and simplest shower wall coverings, FRP board is sold at almost every hardware store and provides a plain white waterproof finish. This was in our first van and held up very well over time.
Corrugated Metal
This is a trend option that I’ve seen a ton in recent builds. It’s a rustic, industrial finish, but using large pieces makes it fairly easy to install. Bungalow Bungahigh has a solid write up on one way to go about it.
Linoleum
Here’s something you probably haven’t seen before. This gentleman installed a linoleum floor on his RV shower walls for an extremely economical waterproof finish. It’s an affordable option, and linoleum is one of the easier waterproof materials to work with - and a few other YouTubers have attempted this with equally successful results.
Truck Bed Liner Paint
Another unusual but effective option is using Rhino Liner (or any brand of truck bed liner, really) to create a waterproof shower wall surface. It’s available in a variety of colors and comes in smoother finishes for easier cleaning. The folks over at AirForums give this a pretty thorough discussion.
Bonus: Marine Paint System
We used Rustoleum topside marine paint (plus the primer and spar varnish required for the full waterproofing system detailed in the paint instructions) so that we could create the framing that our shower door sits in out of wood (we also covered our shower curb in wood painted in this way as well), and it has worked absolutely perfectly. If you look through the reviews, you’ll find quite a few people painting sinks and bathtubs with this stuff to refinish and waterproof them - it’s really pretty cool. We found it pretty late into our build process, but if I was to do my shower again, I’d do a marine paint covered, wooden shower pan and put our teak mat directly into that and bypass any of the actual tiling I did.
Waterproofing
No matter what you cover your shower walls in, you’ll want to triple-check that you haven’t left any seams, gaps, or cracks where water can leak into and potentially cause problems in your underlayment or structure below. We used a grey shower-grade caulk to seal around all of our tile edges, white caulk around the floor tile and any place our shower door framing pieces met tile, and a clear sealant around anything and everything else that looked like it could use it.
The thing about gapping and cracking is that you might not notice it for a long time. Water will slowly seep in, and where there’s water behind tile, there’s often damage that occurs - and damage can amount to having to eventually redo your shower. Extra sealing around any edges and spaces is a very important step that will save you plenty of hassle down the road.
Shower Door Options
Let me sing the praises of yet another aspect of our bathroom - the Nautilus RV Retractable Shower Door. I absolutely love this thing - it’s lightweight, it’s perfectly opaque when in use, it’s self cleaning, and it looks so sharp in our bus. These are custom built to your specs, so you can have a door that perfectly fits your space.
But there are so many other ways you can go here. I have seen glass doors (we had frosted glass in our first rig’s shower and even after swinging open while driving a couple times, it never so much as chipped), barn doors, and even simple shower curtain setups if you’re going the more economical route. This one is truly dependent on your budget and desired finish for the space.
Ventilation: This is something you should generally be aware of in your shower area. While you can go ahead and install a roof vent of some kind directly over your shower stall, if you shower like most travelers and keep water conservation top of mind, chances are the amount of steam and condensation will amount to very little. We have a roof vent fan in close proximity to the shower to help pull out steam in more humid climates, but we rarely use it for that purpose. With your door, however, keep in mind the length of time it’ll take your shower to dry. With a floor-to-ceiling door of almost any type, if the door stays closed after the shower has been used that stall is going to take far longer to dry than it would if the door was open (another reason we love the Nautilus), and the longer something stays wet the greater the propensity for mold and mildew. Something to remember as you design this portion of your space.
Water Heaters
I have plans for a future post on all of the many pros and cons of the different type of water heaters that are available, because making a decision here taps into your electrical and propane abilities, your comfort level, your budget, your desire to cut holes in the side of your bus, and so many other things that go beyond just what works best for your shower. That said, to briefly give you an idea, there are three water heater types that are most commonly seen - electric, propane powered, and combo units that can use either propane or electric. You also have units with tanks that preheat a set amount of water, as well as tankless units that will heat water that flows through them on-demand.
We have this tankless, propane powered unit from RecPro. Definitely more of a splurge item. Overall, we really love the ability to have as much hot water as we want, and it has a great cold-weather feature that will cycle water throughout the unit’s internal plumbing to keep things from freezing. The one downside to this unit (and all tankless units) is that it takes about 15 seconds for the water to start coming out of the showerhead warm, and because we take military-style showers this issue often repeats each time we shut the water off and start it back up. Not an issue on hot desert days, but we’ve had some frigid mornings where we used far more water than I would’ve liked waiting for the heating elements to catch up. I’ve read that leaving the sink hot water on a slow drip prevents this, but I haven’t tried it yet (and will report back when I do).
Shower Heads, Mixers, Shelving, and Floor Mats
There aren’t a lot of rules when it comes to adding your shower’s finishing touches. Here’s our mixer and shower head:
They’re fairly cheap, they’re effective, and they’re holding up well. I would recommend a shower head with a “pause” button - that is, a way to stop the water flow without touching the mixer. It makes it FAR easier to conserve water when you’re showering (and showering will almost certainly use the most water out of any activity you do).
We kept it very simple with shelving and added a wire basket-style shelf that I hung with included waterproof adhesive hooks. I do have some 2x2s in the wall directly behind where our shelf is mounted so that if the adhesive fails I’ll be able to use stainless steel screws to keep it in place - but I always like to drill as few holes as possible where wet environments are concerned, and since the adhesive is working just fine I’ll be leaving it as is for the foreseeable future.
Teak mats are a 100% optional, totally unnecessary addition that we love, but you definitely do not need. Like I mentioned above, we had some issues with standing water in our first van’s shower. The teak mat gets your feet up off the shower floor so that you don’t have to stand in any water that might be pooling. (That said, we do have far less pooling issues this time around). Aside from that, it looks wonderful in the space and really gives it a spa-like feel when using the shower. Teak is a very water-resistant wood that holds up well in wet environments over time; many RV and residential showers boast these kinds of mats as well. We used these teak decking squares to create ours - they snap together and cut extremely easily.
Toilets
I could (and probably will) do an entire separate write up on toilet options, but it’s worth quickly mentioning here. A lot of builds utilize the wet bath model - this is when the toilet is contained inside the shower stall. We also have one of these, with one distinction - we have a cassette toilet, which can be removed from the shower to maximize space when the shower is in use. Why? Because we had a static toilet/black tank system in our first rig that could not be removed from the shower. Essentially, you end up showering sitting down or standing uncomfortably a lot - and we’re fairly small people. It was passable. But it wasn’t great, and we had that issue very much in mind during our bus build.
By all means, include whatever toilet is comfortable for you (the popular Nature’s Head composting toilet can be waterproofed to use inside a shower stall), but if you go the static toilet in a wet bath route, maybe consider oversizing your shower a bit so that it’s comfortable for you when you actually have to use either thing.